

You carefully clean the front teeth that everyone sees, but reaching those molars in the back can feel like an awkward puzzle. At Southgate Dental Centre, our team understands that it’s tempting to want to skip them, but those hidden surfaces need just as much attention as the rest of your smile.
The key to cleaning your back molars is to use floss and a gentle C-shape motion to clean below the gumline. This simple technique helps you remove plaque from those hard-to-reach spots, an important step in protecting your teeth and gums.
Why the Back Molars Matter So Much
Plaque’s Favourite Hideout
Your back teeth have wide, grooved surfaces perfect for chewing and for trapping food. Plaque, a sticky film of bacteria, can build up in these areas because they are often difficult to clean completely with a toothbrush alone. This makes your molars a common place for cavities to start.
Protect Your Gums & Overall Health
When plaque sits between your teeth and along the gumline, it can irritate your gums. Consistent flossing removes this buildup, which helps prevent gum inflammation and bad breath. A healthy mouth also supports your overall well-being, making this small daily habit a valuable part of your routine.
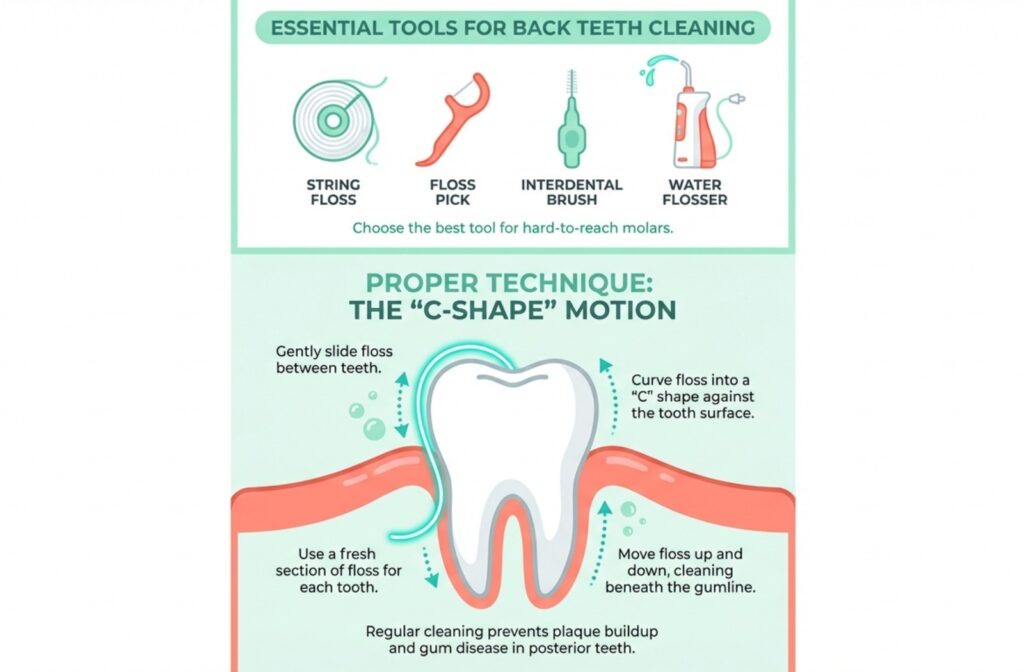
Pick the Right Tool for the Job
Traditional String Floss
Traditional string floss is a classic for a reason. You can find it in a few different styles to suit your needs. Waxed floss is coated to help it glide smoothly between tight teeth, while dental tape offers a wider, flatter surface to cover more of the tooth.
Floss Picks & Holders
If wrapping floss around your fingers feels clumsy, a floss pick or holder can give you a better grip. Some people find they like a floss pick better because it’s:
- Easier to hold and work around your teeth
- Great for those who may have limited movement
- Convenient for on-the-go use
Interdental Brushes
Interdental brushes are small, cone-shaped brushes designed to clean between teeth where regular brushing can’t reach. They come in different sizes to fit various gaps and can be especially helpful for people with braces, bridges, or wider spaces between teeth.
Water Flossers
A water flosser uses a targeted stream of water to flush out food particles and plaque from between your teeth. This can be a comfortable option if you have sensitive gums, braces, or other dental work that makes string floss tricky to use.
Water flossers can provide easy access to your back teeth, making them a popular and convenient choice for cleaning them.
Your Simple 4-Step Method
Once you have your floss, you can follow a few simple steps. A gentle and thorough approach is more important than speed.
- Measure and wrap: Start with a piece of string floss about 45 cm (18 inches) long. Wrap most of it around 1 middle finger and a small amount around the other, leaving a few centimetres in between to work with. This gives you a clean section for each tooth.
- Guide gently: Use your thumbs and index fingers to guide the floss between your back teeth. Curve the floss into a C-shape against the side of the tooth, hugging it. This helps the floss clean the entire side surface, not just the contact point.
- Slide, don’t snap: Gently slide the floss up and down, going just slightly below the gumline where plaque hides. Avoid snapping the floss down onto your gums, which can cause irritation. Use a clean section of floss for each tooth.
- Get behind the very last molar: Don’t forget the very back of your last tooth. Loop the floss around the back surface and use the same gentle up-and-down motion to clear away any plaque that your brush may have missed.
Troubleshoot Common Floss Problems
If Your Gums Bleed
You may notice a little bleeding when you first start flossing regularly. This is often a sign that your gums are inflamed from plaque buildup, and the flossing is doing its job. With gentle and consistent daily flossing, the bleeding should lessen and stop within a week or 2. If it doesn’t, it’s a good idea to book an appointment.
If Floss Shreds or Gets Stuck
If your floss frequently tears or gets caught, it could mean a few things. You might have a tight space between your teeth or a rough edge on a filling. Trying a different type of floss, like a waxed or shred-resistant tape, can sometimes help solve the problem.
How a Dentist in South Edmonton Can Help
During a dental check-up, our team can give your teeth a thorough cleaning and check for any issues that might be making flossing difficult. Your dentist can also offer personalized advice on the right tools and techniques for your specific needs, helping you feel confident in your home care routine.
Book an Appointment
Your comfort matters to us, so if flossing your back molars feels like a challenge, our team at Southgate Dental Centre is ready to help you find a solution that works for you. Schedule your next appointment: We look forward to seeing you.